
8. Inspection Service & Maintenance
8.1. INSPECTION, SERVICE & MAINTENANCE SUMMARY CHARTS
You must inspect, maintain and service your trailer regularly to insure safe and reliable operation. If you cannot or are unsure how to perform the items listed here, have your dealer do them. Note: In addition to this manual, also check the relevant component manufacturer's manual.
Inspection and Service before Each Use |
||
|---|---|---|
| Item | Inspection / Service | Manual Section Reference |
| Breakaway Brakes > Electric |
Check operation |
3.2.1.5., 3.2.2.4. & 3.2.3.2. |
| Breakaway Brakes > Hydraulic |
|
8.2.5.4. |
| Breakaway Battery |
Fully charged, connections clean |
3.2.1.5., 3.2.2.4. & 3.2.3.2. 8.2.5.3.A.(i) |
| Brakes, all types | Check operation | 6.3. |
| Shoes and Drums | Adjust | 6.2., 8.2.5.2. |
| Brakes, Hydraulic - Vacuum Actuated | Check gauge for proper vacuum of 18 In. Hg. (inches of mercury) | 8.2.5.4.A. |
| Coupler and Hitch Ball | Check for cracks, pits, and flats. Replace w/ball & coupler having trailer GVW Rating. Grease. Check locking device & replace. | 8.2.6.1. |
| Gooseneck Ball | Check for cracks, pits, and flats. Replace w/ball & coupler having trailer GVW Rating. Grease. Check locking device & replace when worn. | 3.2.2.1. 8.2.6.2. |
| Fifth Wheel & Kingpin | Check for cracks, Grease. Check locking device & replace when worn. | 3.2.3.1. & 8.2.6.3. |
| Safety Chain(s) & Hooks | Check for wear and damage | 3.2.1.4. & 3.2.2.3. |
| Tires | Check tire pressure when cold. Inflate as needed. | 5.1. & 8.2.10. |
| Wheels Lug Nuts (Bolts) & Hub |
Check for tightness Tighten. For new and remounted wheels, check torque after first 10, 25 & 50 miles of driving and after any impact |
5.1. 6.1. & 8.2.13. |
| Inspection and Service each 3 Months or 3,000 Miles> | ||
|---|---|---|
| Item | Inspection / Service | Manual Section Reference |
| Structure > Hinges, Doors and dividers |
Inspect. Repair or replace damaged, worn or broken parts |
8.2.2 |
| Inspection and Service each 6 Months or 6,000 Miles | ||
|---|---|---|
| Item | Inspection / Service | Manual Section Reference |
| Tires | Rotate @ 5,000 miles | 8.2.10. |
| Brakes, electric > Magnets > Controller (in tow vehicle) |
Check wear and current draw Check power output (amperage) and modulation |
8.2.5.3.C. 8.2.5.3.B. See Controller Mfr's Manual |
| Structure > Roof Vents > Windows |
Clean dirt buildup, lubricate hinges and slides | 8.2.2. |
| Tires | Inspect tread and sidewalls thoroughly. Replace tire when treads are worn, when sidewall has a bulge, or sidewall is worn | 8.2.10 |
| Inspection and Service Each Year or 12,000 Miles | ||
|---|---|---|
| Item | Inspection / Service | Manual Section Reference |
| Brakes, all types > Shoes and drums |
Check for scoring and wear. Replace per manufacturer's specifications |
8.2.5.1. 8.4. |
| Jack, Drop-leg | Grease gears at top | See Jack Mfr's Manual |
| Structure > Frame members > Welds |
Inspect all frame members, bolts & rivets. Repair or replace damaged, worn or broken parts.
Inspect all welds. Repair as needed |
8.2.1. 8.2.2.2. |
| Wheels > Sealed Bearings (Hubs) > UNSEALED Bearings (Hubs) >Rims |
Check and confirm free running. Replace if not (sealed bearings are not serviceable)
Disassemble / inspect / assemble and repack. Replace promptly if immersed in water. Inspect for cracks & dents. Replace as needed. |
8.2.12. 8.2.12.1. 8.4. 8.2.11. |
| Structure > Axle Attachment Bolts |
Check BY DEALER | 8.2.1. |
8.2. INSPECTION AND SERVICE INSTRUCTIONS
8.2.1. Axle Bolts, Frame, Suspension, & Structure and Jacking Points
Worn or broken suspension parts can cause loss of control and injury may result. Have trailer professionally inspected annually and after any impact.
To perform many of the inspection and maintenance activities, you must jack up the trailer. "Jacking Points for All Trailers" figure indicates the general areas where jacks and jack stands may be applied.
When jacking and using jack stands, place them so as to clear wiring, brake lines, and suspension parts (springs, torsion bars, etc.). Place jacks and jack stands inside of the perimeter strip on the supporting structure to which the axles are attached.
| Jacking Points for Trailer | |
|---|---|
| Single Axle | Tandem/Triple Axle |
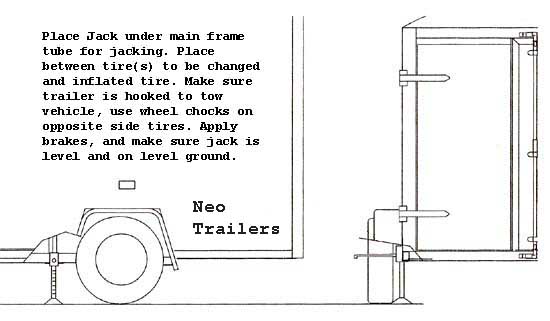 |
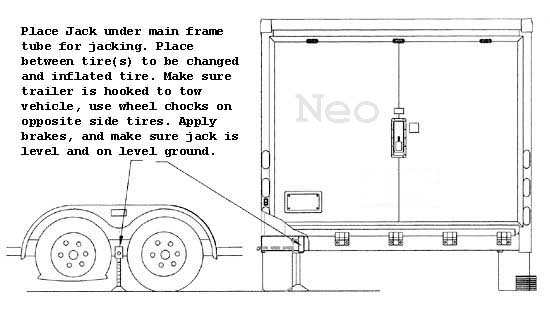 |
Never crawl under your trailer unless it is on firm and level ground and resting on properly placed and secured jack stands.
Because the trailer floor receives the most abuse, it will most likely corrode before any other part of the structure. This is particularly true for horse and livestock trailers, having floors subjected to urine and manure. The urine and manure are corrosive to the aluminum flooring and other structural parts of the trailer.
Remove the rubber mats from the floor of the trailer, and wash them, at least every three months. Using a power washer and a detergent solution, wash both sides of the rubber mat, as well as the floor and walls of the trailer. Rinse the rubber mat and the trailer floor and walls. Be sure the rubber mat and trailer floor are completely dry before replacing the rubber mat.
8.2.2.1. Fasteners and Frame Members
Inspect all of the fasteners and structural frame members for bending and other damage, cracks, or failure. Repair or replace any damaged fastener and repair the frame member. If you have any questions about the condition or method of repair of fasteners or frame members, get the recommendation of, or have the repair done by, your dealer.
The various fastener types used on your trailer are:
Broken or damaged fasteners or welds can cause injury or damage to trailer and contents. Inspect for, and repair all damaged parts at least once a year.
All welds can crack or fail when subjected to heavy loads or movement of cargo that was not properly tied to prevent movement. Any time that you know or suspect that the trailer has been subjected to heavy loads or movement of cargo, immediately inspect the welds and fasteners for damage. To prevent severe damage to your trailer, inspect all of the welds for cracks or failure at least once a year.
Improper weld repair will lead to early failure of the trailer structure and can cause serious injury or death.
Do not repair cracked or broken welds unless you have the skills and equipment to make a proper repair. If not, have the welds repaired by your dealer.
8.2.3. Drop Ramp Torsion Springs
If your trailer has a drop-ramp door, the weight of the door may be partially held by a torsion spring and a cable. Stand to the side when opening the drop ramp. You could be hurt if you are behind the drop ramp and the counterbalance does not work.
Inspect the cable and cable ends regularly for fraying and signs of loosening. If released, a torsion spring can inflict serious injury.
The torsion spring and cable are not user serviceable. The torsion spring must be serviced by a person who is Expressed in torsion spring safety.
The optional slide-out facility is fitted with shafts, bushing, gears and sliding members located on the underside of the trailer, These parts are exposed to road grime, water and possible salt spray. Clean and lubricate the moving parts regularly to keep the slide-out from seizing.
Follow the instructions below to clean and lubricate the slide-out mechanism at least once per season, and more frequently if your trailer is operated in dusty or salt-spray environments.
8.2.5.1. Brake Shoes and Drums
Properly functioning brake shoes and drums are essential to ensure safety. You must have your dealer inspect these components at least once per year, or each 12,000 miles.
The brake shoes must be adjusted after the first 200 miles of use, and each 3,000 miles thereafter. Most axles are fitted with a brake mechanism that will adjust the brakes during a hard stop. Read your axle and brake manual to see how to adjust your brakes. If you do not have this manual, call Neo Manufacturing, LLC. at 269-503-7630 for a free copy.
8.2.5.2. Manually Adjusting Brake Shoes
Some braking systems are not automatically adjusted by hard stopping. These brakes require manual adjustment. The following steps apply to adjust most manually adjustable brakes. Read your axle and brake manual to see how to adjust your brakes. If you do not have this manual, call Neo Trailers at 269-503-7630 for a free copy.
Two different types of electric brakes may be present on the trailer: an emergency electric breakaway system, which acts only if the trailer comes loose from the hitch and the breakaway pin is pulled. The other brake is an electric braking system that acts whenever the brakes of the tow vehicle are applied.
8.2.5.3.A.(i) Breakaway Battery
This battery supplies the power to operate the trailer brakes if the trailer uncouples from the tow vehicle. Be sure to check, maintain and replace the battery according to the battery manufacturer' instructions. 8.2.5.3.A.(ii) Breakaway Switch
This switch causes the breakaway battery to operate the electric brakes if the trailer uncouples from the tow vehicle.
The pull cable for the pull pin is connected to the tow vehicle, and the switch is connected to the trailer. To check for proper functioning of the switch, battery and brakes, you must pull the pin from the switch and confirm that the brakes apply to each wheel. You can do this by trying to pull the trailer with the tow vehicle, after pulling the pin. The trailer brakes may not lock, but you will notice that a greater force is needed to pull the trailer.
If electric breakaway brakes do not operate when trailer is uncoupled from the tow vehicle, death or serious injury can occur. Check emergency breakaway brake system BEFORE each tow.
8.2.5.3.B. Tow Vehicle Operated Electric Brakes
The electric brakes that operate in conjunction with the tow vehicle brakes must be "synchronized" so that braking is properly distributed to the tow vehicle brakes and the trailer brakes. For proper operation and synchronization, read and follow the axle/brake and the brake controller manufacturers' instructions. If you do not have these instructions, call Neo Trailers at 269-503-7630 for a free copy.
8.2.5.3.C. Magnets For All Electric Brakes
To make certain an electrically-operated braking system will function properly, you must have your dealer inspect the magnets at least once a year, or each 12,000 miles. See the brake manual for wear and current inspection instructions.
8.2.5.4. Brakes, Hydraulic (vacuum, air or electric operated)
If your trailer has hydraulically-operated brakes, they function the same way the hydraulic brakes do on your tow vehicle. The hydraulic braking system must be inspected by a dealer, at least as often as the brakes on the tow vehicle, but no less than once per year. This inspection includes an assessment of the condition and proper operation of the wheel cylinders, brake shoes, brake drums and hubs.
You must check the fluid level in the master cylinder reservoir at least every three months. If you tow your trailer an average of 1,000 miles per month in a hot and dry environment, you must check the brake fluid level once a month. The brake fluid reservoir is located on the tongue of the trailer or near the gooseneck. Fill with DOT 4 brake fluid.
8.2.5.4.A. Vacuum-Operated Hydraulic
When towing a trailer, the vacuum gauge, which is located inside the cab of the tow vehicle, must indicate 18 In. Hg. (inches of mercury) or more at all times.
If the vacuum gauge in tow vehicle is not at or above 18 In. Hg. (inches of mercury), damage to the brake system will result and the brakes may become inoperable.
8.2.5.4.B. Air Pressure-Operated Hydraulic
Air/hydraulic braking systems are typically used when the tow vehicle has a diesel engine. The tow vehicle has an air compressor that routes the air to an air/hydraulic mechanism, which sends brake fluid to the wheel cylinders.
The air pressure gauge in your tow vehicle indicates the current air pressure. See your tow vehicle manual for the proper air pressure.
8.2.5.4.C. Electrical-Operated Hydraulic
Electric/hydraulic braking systems, which are mounted on the trailer, use a small electrically-driven pump to generate hydraulic pressure, which operates the brake cylinders. Like electrical brakes, an electric/hydraulic braking system is operated by an electrical signal from the tow vehicle.
8.2.6. Trailer Connection to Tow Vehicle
The coupler on the trailer connects to the ball attached to the hitch on the tow vehicle. The coupler, ball and hitch transfer the towing forces between the tow vehicle and the trailer. Before each tow, coat the ball with a thin layer of automotive bearing grease to reduce wear and ensure proper operation; and check the locking device that secures the coupler to the ball for proper operation.
See the coupler manufacturer's manual for other inspection and maintenance activities. If you do not have this manual, call Neo Trailers at 269-503-7630 for a free copy.
If you see or feel evidence of wear, such as flat spots, deformations, pitting or corrosion, on the ball or coupler, immediately have your dealer inspect them to determine the proper action to prevent possible failure of the ball and coupler system. All bent or broken coupler parts must be replaced before towing the trailer.
The coupler handle lever must be able to rotate freely and automatically snap into the latched position. Oil the pivot points, sliding surfaces, and spring ends with SAE 30W motor oil. Keep the ball pocket and latch mechanism clean. Dirt or contamination can prevent proper operation of the latching mechanism.
When replacing a ball, the load rating must match or exceed the GVWR of the trailer.
The gooseneck receiver on the trailer connects to a hitch-mounted ball on the towing vehicle. The receiver, ball and hitch transfer the towing forces between the tow vehicle and the trailer. Before each tow, coat the ball with a thin layer of automotive bearing grease to reduce wear and ensure proper operation; and check the locking device that secures the receiver to the ball for proper operation.
See the gooseneck ball receiver manufacturer's manual for other inspection and maintenance activities. If you do not have a manual for the receiver, call Neo Trailers at 269-503-7630 for a free copy.
If you see or can feel evidence of wear, such as flat spots, pitting or corrosion, on the ball or receiver, immediately have your dealer inspect them to determine the proper action to prevent possible failure of the ball and receiver system.
When replacing a ball, the load rating must match or exceed the GVWR of the trailer.
Before each tow, inspect the fifth wheel and kingpin for wear, and coat the contact surface of the fifth wheel plate with water-resistant Lithium-base grease. If you see evidence of wear on the fifth wheel or kingpin, immediately have your dealer inspect them to determine the proper action to prevent failure of the fifth wheel and kingpin system.
See the manual prepared by the manufacturer of the fifth wheel and kingpin for other inspection and maintenance activities. If you do not have this manual, call Neo Trailers at 269-503-7630 for a free copy.
If a grease fitting is present, you must use a grease gun to lubricate the jack mechanism. Grease the gears in the top of hand-cranked jacks once a year, by removing the top of the jack and pumping or hand packing grease into the gears.
Before each tow, check the trailer taillights, stoplights, turn signals and any clearance lights for proper operation.
Improper operating taillights, stoplights and turn signals can cause collisions. Check all lights before each tow.
Your trailer may be outfitted with an accessory battery that operates lighting, electric landing gear, slide-outs or other accessories. An accessory battery may be kept charged either by the tow vehicle or by the generator or shore power. See the manual for the accessory battery.
A disconnect switch may be provided to disconnect the accessory battery when you do not plan to be using the trailer for an extended period, such as seasonal storage. If there is no disconnect switch, then remove the cables from the battery terminals.
The accessory battery must be kept in a charged condition during storage. The battery could freeze and break if it becomes discharged.
Before each tow, be sure the tire pressure is at the value indicated on the sidewall. Tire pressure must be checked while the tire is cold. Do not check the tire pressure immediately after towing the trailer. Allow at least three hours for a tire to cool, if the trailer has been towed for as much as one mile. Replace the tire before towing the trailer if the tire treads have less than 1/16 inch depth or the telltale bands are visible.
A bubble, cut or bulge in a side wall can result in a tire blowout. Inspect both side walls of each tire for any bubble, cut or bulge; and replace a damaged tire before towing the trailer.
Worn, damaged or under-inflated tires can cause loss of control, resulting in damage, serious injury and possibly death.
Inspect tires before each tow.
If the trailer has been struck, or impacted, on or near the wheels, or if the trailer has struck a curb, inspect the rims for damage (i.e. being out of round); and replace any damaged wheel. Inspect the wheels for damage every year, even if no obvious impact has occurred.
8.2.12. Wheels, Bearings and Lug Nuts
A loose, worn or damaged wheel bearing is the most common cause of brakes that grab.
To check your bearings, jack trailer and check wheels for side-to-side looseness. If the wheels are loose, or spin with a wobble, the bearings must be serviced or replaced.
Most trailer axles are built with sealed bearings that are not serviceable. Sealed bearings must be replaced as complete units.
8.2.12.1. Unsealed Bearings (Hubs)
If your trailer has unsealed axle bearings, they must be inspected and lubricated once a year or 12,000 miles to insure safe operation of your trailer.
If a trailer wheel bearing is immersed in water, it must be replaced.
If your trailers has not been used for an extended amount of time, have the bearings inspected and packed more frequently, at least every six months and prior to use.
Follow the steps below to disassemble and service the UNSEALED wheel bearings.
Every time the wheel hub is removed and the bearings are reassembled, follow the steps below to check the wheel bearings for free running and adjust.
Lug nuts are prone to loosen right after a wheel is mounted to a hub. When driving on a remounted wheel, check to see if the lug nuts are tight after the first 10, 25 and 50 miles of driving and before each tow thereafter.
Lug nuts are prone to loosen after initial installation, which can lead to death or serious injury. Check lug nuts for tightness on a new trailer or when wheel(s) have been remounted after the first 10, 25 and 50 miles of driving.
Metal creep between the wheel rim and lug nuts will cause rim to loosen and could result in a wheel coming off, leading to death or serious injury. Tighten lug nuts before each tow.
Tighten the lug nuts to the proper torque for the wheel size on your trailer, to prevent wheels from coming loose. Use a torque wrench to tighten the fasteners. If you do not have a torque wrench, tighten the fasteners with a lug wrench as much as you can, then have a service garage or dealer tighten the lug nuts to the proper torque. Over-tightening will result in breaking the studs or permanently deforming the mounting stud holes in the wheels. Be sure to use only the fasteners matched to the cone angle of your wheel (usually 60 or 90 degrees). Start all bolts or nuts by hand to prevent cross threading. Tighten bolts or nuts in the sequence shown for Torque Requirements. The tightening of the fasteners should be done in stages following the recommended sequence, tighten fasteners per wheel torque chart below.
| Figure 7-1 Lug nut sequence of tightening |
|---|
|
| Lug Nut Torque - Steel Wheels (13/16'' Socket) | |||
|---|---|---|---|
| Wheel Size | 1st Stage Torque | 2nd Stage Torque | 3rd Stage Torque |
| 14" | 20-25 | 50-60 | 90-120 |
| 15" | 20-25 | 50-60 | 90-120 |
| 16" | 20-25 | 50-60 | 90-120 |
| Lug Nut Torque - Aluminum Wheels (3/4'' Socket) | ||||
|---|---|---|---|---|
| Wheel Size | 1st Stage Torque | 2nd Stage Torque | 3rd Stage Torque | |
| 14" | 80-90 | 120 | 120 | |
| 15" | 80-90 | 120 | 120 | |
| 16" | 80-90 | 120 | 120 | |
| 17.5" | 80-90 | 120 | 190-210 | |
| Spring Eye and Shackle Bolt Torque | |
|---|---|
| Socket Size | Torque |
| 11/16'' | 30-50 Ft/Lbs |
| Torsion Hanger Bolts | |
|---|---|
| Socket Size | Torque |
| 15/16'' | 125-175 Ft/Lbs |
| Sprung Axle - Hanger Angle Bracket | |
|---|---|
| Socket Size | Torque |
| 3/4'' | 55-65 Ft/Lbs |
| 1/2'' Coupler Bolts | |
|---|---|
| Bolt Type | Torque |
| Horizontal 1/2'' Bolt | 120 Ft/Lbs |
| Vertical 1/2'' Bolt | 65 Ft/Lbs |
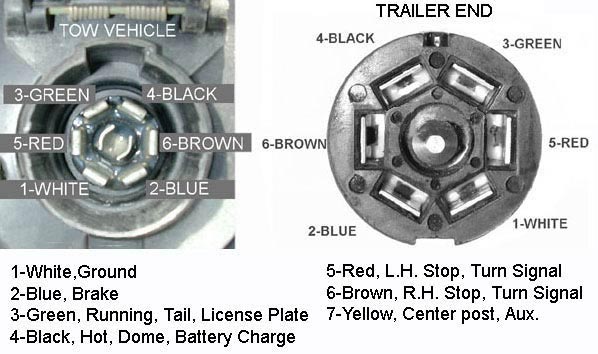
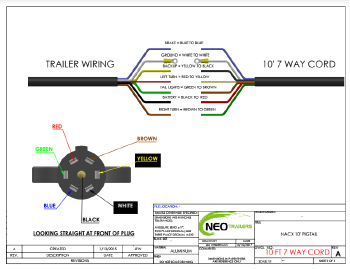
| Neo Wiring Diagrams | |
|---|---|
 7 Wire Circuit |
 6 Wire Circuit |
 4 Wire Circuit |
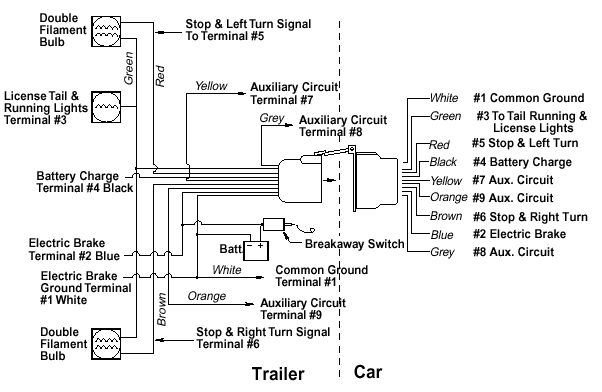 7 Wire Trailer-to-Truck Diagram |
 Trailer Plug |
|
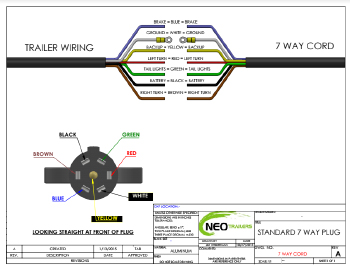 7 WAY CORD |
|
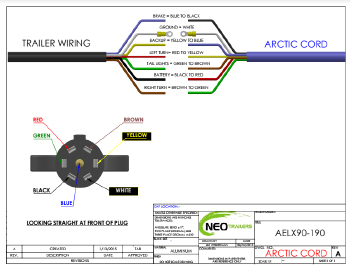 Arctic Cord |
|
 NACX 7 WAY WIRING |
|
http://www.dexteraxle.com/products___literature You will go to Dexter.com
9. NEO WARRANTY INFORMATION